File Commands
Sunday, February 19, 2023
5:58 PM
Archive
Available only by right-clicking a section or notebook
Creates a zip file of all pages in the section or notebook, including all images and file attachments on each page. Also fixes the hyperlinks between pages within the context of the archive so the archive can stand on its own as a working directory of HTML files with live hyperlinks.
Export
Exports the current page or selected content as HTML, Word, PDF, Markdown, OneNote .one format, or internal OneNote XML.
If you choose HTML, you will be given the option to export each page as a single .htm file in the specified folder, or to archive each page into its own sub-folder, optionally with copies of the file attachments on each page.
There are some differences in the way OneMore exports pages from the way OneNote exports pages. If multiple pages are selected, OneMore will create a new file for each page. In comparison, if you choose to export as Word .docx, OneNote will append the content from all pages into a single file.
Note also that there is a difference between an .mht file and an .htm files, where the former has mime-type headers and footers that are not normally present in an HTML file.
File Naming for Exported Pages
As pages are exported into their individual files (except for Word), the following steps are taken to properly give each file a unique name. OneMore takes the first one it finds that is not empty:
- Page title
- First run of text/first paragraph. Could be a Heading or Normal paragraph, up to 40 characters, but also truncated to fit full path within the max OneNote file path length of 239.
- Fabricate a filename like "sectionName_Untitle_Page". In this case, the page likely has only images or ink.
Export is a non-destructive operation, meaning it will not overwrite files. Whether files already exist in the output directory, or there are multiple pages with the same final name, a counter will be appended to differentiate duplicate filenames, e.g.
- C:\data\foo.md
- C:\data\foo (1).md
- C:\data\foo (2).md
- ...
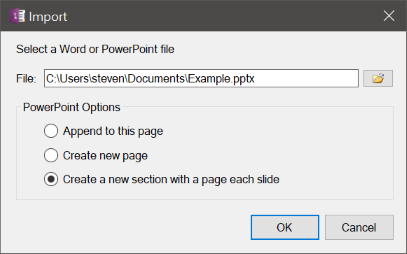
Import
Import Word (.docx), PowerPoint (.pptx), Markdown (.md), OneNote (.one), or XML (.xml) by either appending content to the current page or creating a new page. Additionally, for PowerPoint, each slide can be imported into its own page so you could use OneNote as a PowerPoint presenter by entering full screen mode and using Ctrl-PgDn to move to the next slide.
You can import multiple Word, PowerPoint, or Markdown files by using a wildcard in the name, for example C:\docs\January*.md. Each file will be imported as a separate page; the Append option is not available when importing using wildcards.
Import Hyperlinks
Discovers all external hyperlinks on the current page, presents a dialog from which you can select one or more link to import. Each hyperlink is imported as a separate page.
Import Web Page
Imports the content of a Web page given its URL. The content can be added as a new page in the current section, as a new child page of the current page, or appended to the content of the current page. This can be run in one of two modes. By default, the page is imported as HTML and "optimized" by OneNote, meaning that styles are generally not preserved due to the inherent limitations of OneNote.
The second mode is to import the Web page as a series of static images. This will preserve most styling and layout of the page. It does this by internally printing the page to a PDF and then importing each page of the PDF as an image. This can be a time consuming process, taking up to 30 seconds, so give it time.
Open Folder as Notebook
Opens a local folder hierarchy as a notebook. Subfolders appear as section groups within the notebook. See Restore a Notebook.
If the option to remove timestamps from section names is enabled, OneMore will not allow duplciate sections below a single parent, so will skip those. It will also skip any locked sections. You will need to manually change the names of such sections.
Open in File Explorer
For sections and section groups in a notebook that is stored locally on the current machine (not on OneDrive), this will open the location of that object in File Explorer.
Scan
Scans documents or photos from a connected scanner and appends the images to the current page.
────────────────────────────────────────────────────────────────────────────────────────────────────
Analyze Data Storage
Generates a report, as a new page in the current section, showing how much disk space is consumed by OneNote notebooks and their recycle bins, sections, and pages. It indicates orphaned notebook backups for notebooks that are no longer opened in OneNote. It shows the size of the OneNote internal cache. And it shows a detailed breakdown of image sizes and file attachments embedded on pages along with an indication if the source of a file attachment no longer exists.
Each OneNote notebook maintains its own recycle bin. This can be cleared from the OneNote History menu.
Notebooks can be stored locally in the default OneNote data folder. Or they can be stored remotely in the cloud on OneDrive. Local notebooks are reported directly from the default data folder. Remote notebooks can only be analyzed by looking at their local backup copies as configured in the OneNote Options. The backup feature must be enabled in OneNote options and run at least once in order for the report to show useful information for remote notebooks.
Note that the detailed page analysis, especially when done over all sections in a notebook, can take some time to generate and result in a very large report page.
For large notebooks or sections with pages containing many images, it is possible that the Analyze command will run out of memory and crash OneMore. To avoid this, set the Thumbnails option to None. A summary of all images - count and total size - on each page will be reported rather than the size of each individual image.
File Quick Notes
OneNote Quick Notes are intended to capture small thoughts and ideas quickly and easily from Win + Alt + N or the OneNote system tray icon. All Quick Notes are filed into the same special section at the bottom of the OneNote window called, surprisingly, "Quick Notes". If you compile a large collection of Quick Notes, it's very easy for ideas to get lost, especially considering that these do not have Title fields.
The File Quick Notes command organizes your Quick Notes into a selected section or notebook and collates them using one of several options, set from the Quick Notes page in the Settings Dialog

Choose the Notebook option to file your Quick Notes into a chosen notebook. Notes will be collated into new sections, automatically named accordingly to the creation date of the note, or a #keyword in the first line of the note. The #keyword must be a single word (or phrase without spaces) and only the first hashtag #keyword is used.
Choose the Section option to file your Quick Notes into a chosen section. Each notes is moved as its own page into this section. The Title field is set to the first few words of the note. It's recommended that you also enable the Prepend the tile with the date that the note was created option.
#omwiki #omcommands
© 2020 Steven M Cohn. All rights reserved.
Please consider a sponsorship or one-time donation to support ongoing development
Created with OneNote.